The Comprehensive Homeowner's Guide to a Whole-Home Remodel: Process, People, and Pitfalls - part 2
The Remodeling Journey: A Phase-by-Phase Breakdown
Embarking on a whole-home remodel is a journey through a series of distinct, sequential phases. Understanding this lifecycle is crucial for setting realistic expectations, managing stress, and appreciating the progress being made, even when it is not immediately visible. This section provides a chronological guide to the entire project, demystifying the process from the initial spark of an idea to the final, transformative touches.
The Pre-Construction Gauntlet: Design, Permits, and Planning
The pre-construction phase is the most underestimated, yet most critical, part of the entire remodel. While it can feel like a period of frustrating inactivity, this is where the project's success is forged through intense decision-making, meticulous planning, and essential administrative work. This phase alone can easily take several months, often longer than the physical construction itself.
- Phase 1: Discovery & Design (4 to 16+ weeks)
This is the foundational stage where your vision is defined and translated into a buildable plan.- Discovery (2-8 weeks): The process begins with initial consultations with potential partners. This is where you interview contractors or design-build firms, discuss your goals, establish a preliminary budget, and assess professional fit.
- Architectural Design & Material Selections (6-16 weeks): This is the creative engine of the project. Your chosen team will translate your vision into detailed architectural drawings, structural plans, and often 3D renderings. Simultaneously, you will be guided through the process of selecting every material, fixture, and finish for your home—from flooring and cabinets to faucets and light fixtures. This is a period of thousands of decisions, and finalizing them early is crucial to preventing costly changes and delays once construction begins. Modern firms increasingly use technologies like 3D modeling and Virtual Reality (VR) to make this process more intuitive. These tools allow you to "walk through" a digital version of your renovated space, providing a realistic sense of scale, flow, and aesthetics. This immersive experience bridges the communication gap between homeowner and designer, reduces misunderstandings, and allows for real-time experimentation with different layouts and finishes, ultimately increasing confidence and preventing expensive post-construction regrets.
- Phase 2: Permitting & Municipal Compliance (4 to 10+ weeks)
Obtaining the required permits is a non-negotiable legal requirement. It is not a mere bureaucratic hurdle but a critical safeguard that ensures your project complies with local codes for safety, structural integrity, and zoning. Any project involving structural changes, additions, or significant electrical, plumbing, or HVAC work will require a permit. Attempting to work without one can lead to severe consequences, including hefty fines, stop-work orders, forced demolition of completed work, voided homeowner's insurance, and significant complications when you try to sell your home. The process involves submitting detailed plans to the local building department, followed by a plan review that can take weeks or even months, depending on the jurisdiction's backlog. The approved permit then triggers a series of mandatory inspections that will occur throughout the construction process. - Phase 3: Pre-Construction & Logistics (2-4 weeks)
With designs finalized and permits in process, your contractor moves into the final logistical preparations. This includes creating a detailed master construction schedule, ordering all long-lead-time materials (like custom cabinetry and windows, which can take weeks or months to arrive), and confirming schedules with all subcontractors. On-site, this is when preparations are made to protect non-renovated areas of the home with plastic barriers, a dumpster is placed, and temporary living facilities (like a mini-kitchen) are set up if you plan to live in the house during the remodel.
The total project timeline is disproportionately controlled by this pre-construction phase. While construction may take 4 to 6 months, the pre-construction activities can easily take just as long, if not longer. The single greatest variable within this phase—and the biggest threat to the schedule—is homeowner indecisiveness. A delay in finalizing design choices or material selections creates a cascade of subsequent delays: the final plans cannot be drawn, which means the permit application cannot be submitted, which means long-lead-time materials cannot be ordered, which ultimately pushes back the construction start date. A two-week delay in selecting a countertop can easily ripple into a six-week delay for the entire project. Therefore, the most effective way for a homeowner to maintain momentum is to be decisive, responsive, and engaged during this critical planning period.
The Comprehensive Pre-Construction Timeline
Phase | Key Activities | Estimated Duration | Key to Keeping on Track (Homeowner's Role) |
Discovery & Scope | Interviewing contractors, defining goals, establishing a preliminary budget. | 2–8 Weeks | Be clear about your goals and budget constraints. |
Architectural Design | Creating architectural drawings, structural plans, and 3D renderings. | 4–12 Weeks | Provide timely and clear feedback on design iterations. |
Material Selections | Choosing all finishes: flooring, cabinets, counters, fixtures, paint, etc. | 2–6 Weeks (Concurrent) | Be decisive. Finalize all choices to avoid future changes. Treat this like a job with deadlines. |
Permitting & Review | Submitting final plans to the local building department for review and approval. | 4–10+ Weeks | Be patient; this timeline is controlled by the municipality. Ensure your contractor submits a complete and accurate application. |
Logistics & Ordering | Contractor finalizes schedule, orders materials, and lines up subcontractors. | 2–4 Weeks | Make on-time contract payments to ensure materials can be ordered without disruption. Prepare your home for construction. |
The Construction Lifecycle: From Demolition to Drywall
This marks the beginning of the physical transformation of your home. It is a period of noise, dust, and disruption, but also one of tangible progress as the new space begins to take shape. The sequence of operations during this stage is critical, with each step building upon the last.
- Stage 1: Demolition (1-2 Weeks)
The project kicks off with the "tear-out" or demolition phase. This can range in intensity from the careful removal of cabinets and fixtures to a full "gut" renovation, where the interior is stripped down to the structural studs and subfloors. This stage is invariably loud and messy. It is also the moment of truth, as demolition is when most unforeseen problems—such as hidden water damage, wood rot, pest infestations, or hazardous materials—are uncovered. - Stage 2: Structural Work & Framing (2-6 Weeks)
With a clean slate, the rebuilding begins. The skeleton of your new home is constructed during the framing stage. Carpenters will build new walls, install beams to support newly opened-up spaces, and frame any additions. For an addition, this phase also includes crucial foundation work (excavation and pouring concrete) and the installation of the new roof structure to weatherproof the space as quickly as possible. This work is fundamental to the home's integrity, and a municipal framing inspection is typically required before the project can proceed. - Stage 3: Mechanical Rough-Ins (2-4 Weeks)
Following framing, the project enters a long and technically complex phase known as the "rough-in". This involves installing all the vital systems that will be concealed within the walls, floors, and ceilings. While progress may not seem as dramatic day-to-day, this work is the central nervous system of the home. The installation follows a specific sequence:- HVAC: Technicians install the ductwork for heating, ventilation, and air conditioning systems.
- Plumbing: Plumbers run new water supply lines and drain/sewer pipes to the locations of future sinks, tubs, showers, and toilets.
- Electrical: Electricians run wiring for all new outlets, switches, light fixtures, and appliances through the open wall studs. This is the last practical opportunity to make decisions like adding an extra outlet or moving a light switch.
- This phase concludes with a series of critical municipal inspections. An inspector must approve the rough electrical, plumbing, and mechanical work before the walls can be closed up.
- Stage 4: Insulation
Once all the in-wall systems have passed inspection, insulation is installed in the wall cavities, floors, and ceilings. This is a crucial step for the home's long-term energy efficiency and soundproofing. Depending on the jurisdiction, another inspection may be required to verify proper insulation installation before drywall can be hung.
The mechanical rough-in phase represents a critical nexus of project complexity and financial risk. The work is intricate, interdependent, and will soon be hidden from view. Any errors made at this stage—a misplaced pipe, a faulty wire, a poorly sealed duct—are exponentially more difficult and expensive to correct once the drywall is installed. Fixing a post-drywall mistake requires demolition of the new wall, the repair itself, and then re-installation of drywall, tape, mud, and paint, magnifying the cost significantly. For this reason, the series of municipal rough-in inspections should not be viewed by the homeowner as an inconvenient delay. Rather, they are a crucial, free, third-party quality control check. These inspections provide verification from a licensed expert that this complex work has been performed in compliance with established safety codes, dramatically reducing the risk of future system failures or safety hazards. Homeowners should confirm with their contractor that each of these inspections has passed before allowing the project to move to the next stage.
The Transformation Unveiled: Finishes, Fixtures, and Final Touches
This is the phase where the house truly begins to feel like a home again. The raw construction materials give way to the beautiful finishes and fixtures selected during the design phase. The visual progress is rapid and rewarding, but the sequence of installation remains critical to protect newly finished surfaces and ensure a high-quality result.
- Stage 5: Walls & Ceilings (1-2 Weeks)
The installation of drywall (also known as wallboard or plasterboard) marks a major turning point, transforming the open-stud framing into defined, solid rooms. Sheets of drywall are hung, and the seams are covered with joint tape and multiple layers of "mud" (joint compound). This is then meticulously sanded to create a perfectly smooth, seamless surface. While this is a very dusty process, the result is a clean canvas ready for finishing. A coat of primer and the first coats of paint are often applied at this stage, before flooring or cabinetry is installed, to prevent drips and overspray on finished elements. - Stage 6: Flooring, Windows & Doors
While exterior windows and doors are typically installed earlier in the process to secure and weatherproof the home , interior doors are hung at this stage. Hard surface flooring—such as hardwood, engineered wood, tile, or luxury vinyl plank (LVP)—is also installed. The exact timing can vary; some contractors prefer to install flooring after cabinetry to protect it, while others install it wall-to-wall before cabinets are set. This is a logistical decision best left to the professional GC. - Stage 7: Cabinetry & Built-ins (1-2 Weeks)
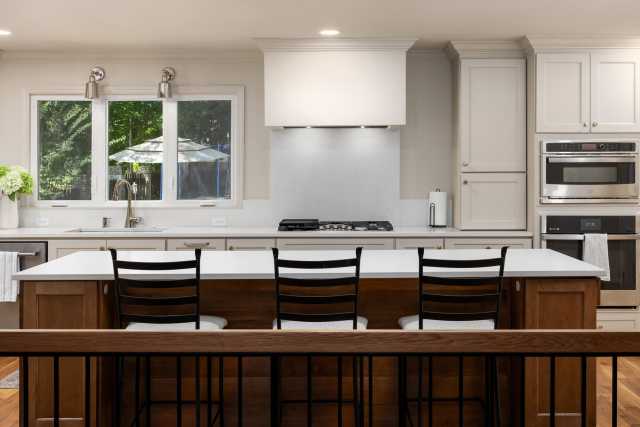
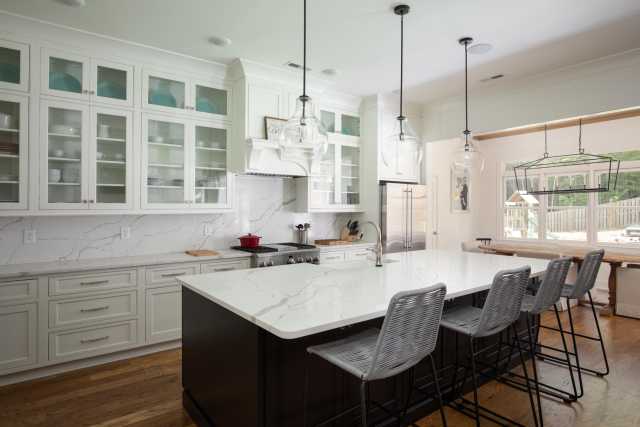
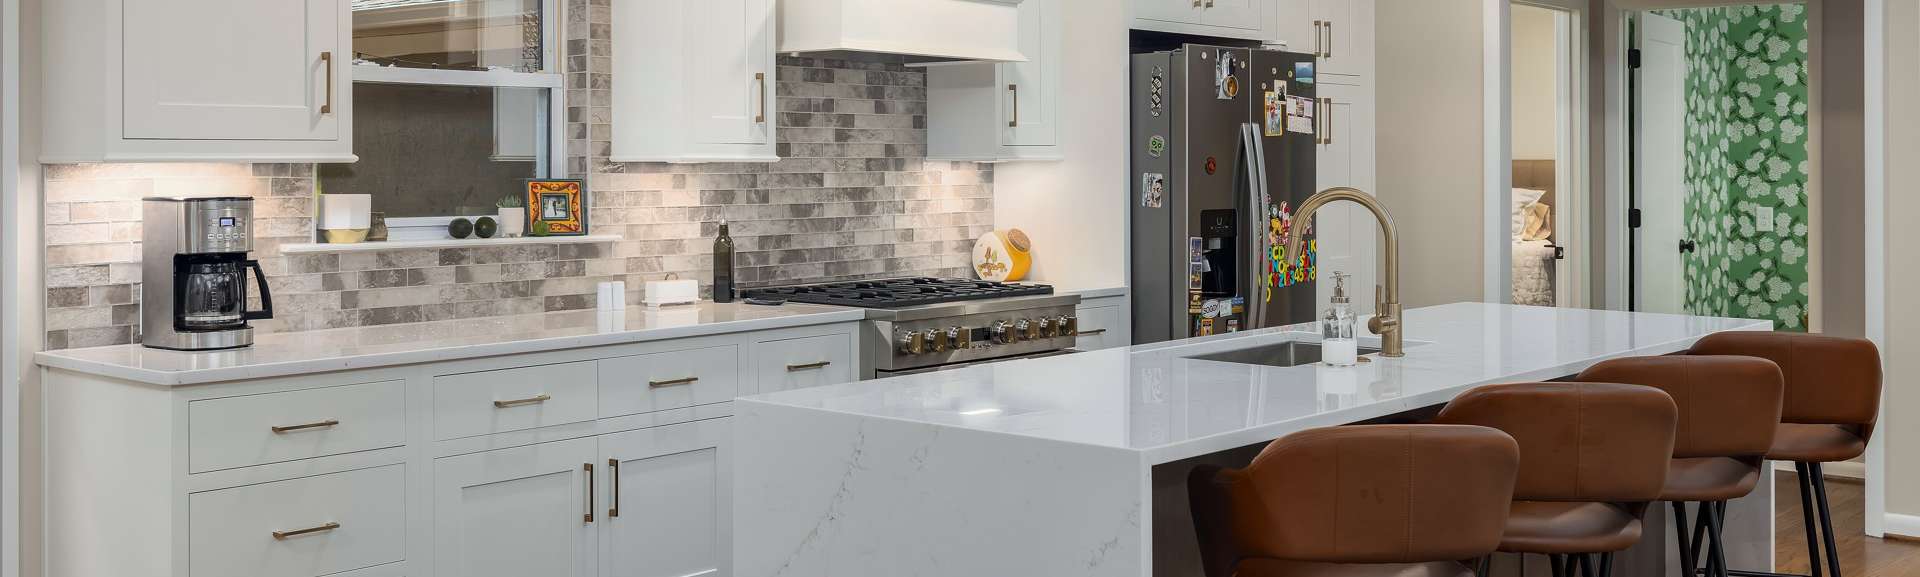
The installation of cabinetry is a significant milestone that defines the functionality and character of key rooms. Kitchen cabinets, bathroom vanities, and any other custom built-ins like bookcases or entertainment centers are carefully set in place. This is often the moment when the homeowner can truly begin to visualize themselves living and working in the new space. - Stage 8: Countertops & Tiling
Once the base cabinets are installed and secured, precise measurements are taken for the countertops. The selected material (e.g., quartz, granite, marble) is then fabricated and installed. Following the countertop installation, tile work can be completed. This includes kitchen backsplashes and all the tile for bathrooms, such as shower surrounds and floors. - Stage 9: Finish Trades & Appliances (1-2 Weeks)
With the main surfaces in place, the specialized trades return for their "finish" work. Plumbers install and connect sinks, faucets, garbage disposals, and toilets. Electricians install all the light fixtures, switches, outlet receptacles, and cover plates. HVAC technicians install the vent covers and connect the thermostat. During this time, the major appliances—refrigerator, stove, dishwasher, microwave, washer, and dryer—are delivered and installed, making the home largely functional. - Stage 10: Final Finishes & Painting
The last interior construction steps involve the work of finish carpenters, who install decorative trim like baseboards, crown molding, and casing around windows and doors. Finally, painters return for the final coat of paint on walls and all the new trim, as well as any necessary touch-ups to correct scuffs or marks made during the installation of other finishes.
The finishing stage is where budget discipline and emotional resolve are most severely tested. After months of planning and construction, homeowners often experience "finish fatigue." As the real fixtures and materials are installed, it is tempting to second-guess choices made weeks or months earlier. This is the point where "scope creep"—the gradual expansion of the project with small, unbudgeted upgrades—is most seductive. A thought like, "That light fixture doesn't look quite right, I'll just swap it for this other one that's only $200 more," seems minor in isolation. However, when this logic is applied to dozens of items—cabinet hardware, faucets, tile accents—it can quickly add thousands of dollars to the final cost. Furthermore, changing a selection at this late stage often triggers a formal "change order," which includes not just the cost of the new item but also additional labor and potential rescheduling fees that can cause significant delays. The most effective strategy for a prudent homeowner is to front-load all decision-making into the design phase and then commit to those choices. The finishing stage should be reserved for execution, not for last-minute shopping.